was released in 1994 by Microprose.
Colonization is heavily based on Civilization which some consider
to be the best turn-based strategy game for the PC in the history of
mankind.
was released in 1994 by Microprose.
Colonization is heavily based on Civilization which some consider
to be the best turn-based strategy game for the PC in the history of
mankind.
Welcome to FreeCol! If you’re interested in development of this program, please see the FreeCol web site. This is a draft version of the user’s guide. You can find the latest version at the FreeCol homepage.
The FreeCol team aims to create an Open Source version of Colonization (released under the GPL). However, FreeCol differs from the original game in two regards: it supports multiplayer games and uses an isometric map. At some point in the future, we might also add support for rectangular tiles similar to those used in the original game.
FreeCol 1.0 will implement all features and rules of the original game that we are aware of. Although we have not reached that goal yet, the game has been playable for several years now.
At the same time, we are adding features and optional rules not found in the original game. In particular, units, buildings, terrain types, goods and other game objects are far more configurable than they were in the original game. In fact, the game already includes two slightly different rule sets.
The original Colonization was released in 1994 by Microprose.
Colonization is heavily based on Civilization which some consider
to be the best turn-based strategy game for the PC in the history of
mankind.
In Civilization the object of the game was to build a nation that could stand the test of time and that could also do one of the following: conquer the world or be the first to launch a spaceship. In Colonization things are bit different...
A Colonization game starts in 1492 and the object of the game is to colonize America. You begin the game with one vessel and two colonists.
As in Civilization you need to build a powerful nation, but fortunately in the early part of the game you’ll be able to send ships back to Europe in order to sell the goods you’ve produced or to bring back some colonists. Getting colonists into the new world is a very important aspect of the game as one game turn takes one year and later on even one season and as a result colonies don’t grow as rapidly as they do in Civilization. You can pay colonists to come to the new world or you can show off with the religious freedom of your people in which case they will hop on your vessels for no money at all.
Another important aspect is trade: the source of all income (apart from Inca and Aztec gold). In a land filled with precious resources it is important to build your colonies at the right location and to place craftsmen where they belong. This is not only to have an income but also to be able to live off the land when you can no longer count on the support of Europe.
Through all this you’ll have to decide whether or not you want to live next to the native americans peacefully. They can teach your colonists new skills that cannot be tought anywhere else and they will offer you goods in case you choose to treat them as your friends. On the other hand, their villages can be attacked and their valuable goods can be taken from them and sold in Europe.
Other European forces are also busy occupying their piece of the new world. Should their borders go too far then take over some of their colonies by force because they wouldn’t hesitate to do the same thing to you.
The object of Colonization is to declare your independence and survive an attack of the King’s forces. Before declaring your independence you need to have the majority of the people behind you. This can be done by promoting free speech and by providing a strong governmental system.
FreeCol is slowly turning into a game engine that allows the implementation of many different games based on similar concepts. It is already possible to define different rule sets and to select one of them when starting a new game. At the moment, FreeCol ships with two rule sets accessible to the user: “Classic”, which attempts to emulate the rules of the original game as far as possible, and “FreeCol”, which mainly conforms to the rules of the original game, but differs in a few points. The “FreeCol” rule set introduces four additional European powers with new national advantages, for example.
In this manual, we always talk about the “Classic” rule set unless we explicitly mention another rule set. Please note that most of the features of terrain types, unit types, building types, founding fathers and so on could be changed by another rule set. If the manual states that a Lumberjack has a movement allowance of three, or that the Prairie produces three units of Cotton, then this applies to the “Classic” rule set and the “FreeCol” rule set. Another rule set might change these values, or might not even include a Lumberjack, the Prairie terrain, or Cotton.
1.3.1 Differences between the rule sets
The following differences between the “Classic” rule set and the “FreeCol” rule set exist:
Liberty and Immigration are two very important aspects of the game. The more liberty you “accumulate”, the more your colonists will support your policies. In time, they will work harder, thus gaining a production bonus, and will support independence from the home country. Since you can not secede from your home country before at least half of the population supports independence, and since popular support has a large influence on your final score, the accumulation of liberty must clearly be a priority.
Liberty points are also required to elect new members to the Continental Congress. Each of these “founding fathers” can increase your abilities in a different way.
Nor should you neglect Immigration, since immigrants from Europe are likely to be your main source of skilled and unskilled labour early in the game. As your colonies become more and more self-sufficient and you build great universities to teach even the most demanding professions, immigrants from Europe become less important. But since the number of colonists is one of the most important factors contributing to your final score, you might wish to attract further immigrants even in the late stages of the game.
In the original game, liberty points were virtually identical to Liberty Bells, and immigration points were indistinguishable from Crosses. In the classic rule set and the default rule set, one Liberty Bell produces exactly one liberty point, and one Cross produces exactly one immigration point.
However, new rule sets can change this ratio, or even introduce new types of goods that also produce liberty or immigration points. For example, you could introduce gold as a new type of goods that produces a large number of immigration points (say five immigration points per unit of gold) in order to simulate gold rushes.
You can download a system independent installer, which should install FreeCol and set up the required shortcuts on your desktop. If everything works as planned, you will only need to double click the icon in order to start the game. If this is not the case, then please read the following paragraphs.
FreeCol comes with a multi-lingual desktop entry file for Linux, which is not installed by default, however. In order to install it, you need to copy the file “freecol.desktop” from the base install directory to the appropriate folder (e.g. “/usr/share/applications” or “ /.local/share/applications/”). You also need to edit the icon path defined in the file to match the location of the freecol icon.
FreeCol is written in Java. In order to run, it requires a Java Virtual Machine. FreeCol should run on any platform on which a Java Virtual Machine compatible with Sun Java 8 or higher is available.
FreeCol is known to work with Oracle Java and OpenJDK. FreeCol is known to run on recent versions of Windows, Linux, and Mac OS X. If you are using FreeCol on a different platform, we would like to hear about it.
FreeCol requires at least 256 MB memory, although some systems slow down badly and require 512MB. FreeCol works best with a screen resolution of at least 1024x768 pixels. It should also be possible to play the game with a screen resolution of 1024x600 pixels, although some panels will look a bit cramped. You can play the game with an even smaller screen, but we do not support that, and some things might not work.
FreeCol uses context menus in several places. On most platforms, context menus are opened with a click of the right mouse button. If you have only one mouse button, holding down the control key while clicking the mouse button should also work. Some versions of Java on Windows are unable to display context menus that extend beyond the game window correctly. As we are unable to fix that, we display the context menu in the top left corner of the game window in these cases.
In order to compile FreeCol you will need Java and the Ant build system. When these are installed, go to the root directory of FreeCol and type ant to build a JAR file containing the game. The game is started using the command java -Xmx512M -jar FreeCol.jar.
If something goes wrong, please open a bug report at the SourceForge page of FreeCol. Use the command ant -projecthelp to find out about other kinds of things you can build (this manual, for example). Note that you will require additional software to build the manual, however.
This section will provide information about various interface elements, as well as the keyboard shortcuts and the different actions that can be used in the game.
If you installed FreeCol with the system independent installer, or the Windows installer, there should be a shortcut on your desktop. Double click the icon in order to start the game. If that does not work, or if you prefer using the command line, then please read the following paragraphs.
If you are in the directory in which FreeCol is installed, you can start the game with the command java -Xmx512M -jar FreeCol.jar. This will tell the Virtual Machine to load the game and to set the maximum heap size to 512 MB. Refer to the manual of your Java Virtual Machine for details.
There are many other Java options, but you probably won’t need to change the default settings. FreeCol is developed in English, but it includes translations into many other languages, some of which are not very complete, however. Java will automatically select the translation for your locale, if available, and English otherwise. If you should wish to select a different language, or if language selection fails, you can choose a different language from the preferences menu.
FreeCol also provides several application-specific command line options:
There are several other options that you will probably only be interested in if you are a developer or need detailed debugging information:
If you start FreeCol without command line options, the game will first open a dialog that allows you to continue a game already started, to start a new game, to open a saved game, to open the map editor, to set various options, and to quit.
If you decide to start a new game, you will be presented with another dialog, which enables you to start a single-player game, to retrieve a list of servers from meta.freecol.org, to join a multi-player game, or to start a new multi-player game.
If you start a new single-player or multi-player game, you must also decide whether to use fixed or selectable national advantages, or no national advantages at all. In the original game, national advantages were always fixed. The Dutch, for example, always had a trading advantage. You must also decide which rule set to use. At the moment, FreeCol comes with two rule sets, namely “FreeCol” (the default) and “Classic”. In the future, we will probably distribute additional rule sets contributed by players. If you join another game, then you must accept the settings the game’s owner selected.
The next screen allows you to select an appropriate difficulty level. The game comes with five pre-defined difficulty levels: “Very Easy”, “Easy”, “Normal” (the default), “Hard” and “Very Hard”. The level is defined by about two dozen different settings, such as the amount of gold you start the game with. If you select “Very Easy”, for example, you will start with 1000 gold, if you select “Easy”, you will start with only 300 gold, and in higher levels you will start entirely penniless.
You can also create your own custom difficulty level. Just select the difficulty level that is closest to what you want (i.e. select “Very Hard” if you want a difficulty level that is even harder) and press the “edit” button to change the settings. Please note that the range of all settings is limited.
The next screen allows you to select which European and native nations will be present in the game, which colour will be used to represent them, and whether they will be played by humans or computer players. At the moment, human players can only select a European nation. In future, that might change. If you chose selectable national advantages, then you can also change the national advantage of the nation you are playing.
The original game only included four European nations, namely the Dutch, English, French and Spanish. FreeCol includes eight, mainly in order to support large multi-player games, but also in order to include the Portuguese, who were sadly absent from the original game. By default, however, only the original four European nations are selected.
The table headers for the Nation and Advantage columns are buttons that will take you to the relevant sections of the Colopedia. Also see the chapter on your Home Country for further information on the national advantages of various European nations.
This screen also allows you to change various game options.
If you choose to retrieve a list of running games from the metaserver, your computer will attempt to establish a connection to meta.freecol.org, port 3540. You will be presented with a list of games, from which you can select one to connect to. Please note that the list will frequently be empty, since not that many public multi-player games are being run.
If you wish to join a multi-player game, you must enter the IP address of a server that is running a FreeCol game as well as the port it is running on. The default port is 3541. If you join a multi-player game, you can also choose a nation and colour, but another players might already have selected your preferred nation.
Setting up a multi-player game
If you wish to start a multi-player game, then the IP address of the server will be that of your computer, but you must still select a port to run the server on. Again, the default port is 3541. You must also decide whether you want to run a public server or a private server. By default, you start a private game, which means that the game will not be available on the metaserver. Furthermore, you must decide on the number of European players (see above), and whether to use national advantages. A multi-player game may be more balanced if you do not use them, so that all players start with the same units and abilities.
FreeCol is a client-server game. The game server takes care of the game logic, and the client provides the graphical user interface. One or several clients can connect to the game server via the network. In the case of a single-player game, all other players are handled by the game server. At the moment, however, your client uses a network connection even if the server is running on the same computer.
This means that you can only run FreeCol if you have the necessary privileges to bind an unprivileged port. If you use a personal firewall that blocks the port you wish to use, you will need to configure your firewall accordingly. If you wish to retrieve a list of games from the metaserver, you also need to configure your firewall to permit connections to that server, port 3540. In order to connect to a server, your client also needs to bind a port. Which port depends on the operating system you use.
If you are running a public game server, then your firewall must also permit the clients to connect to the port of the game server.
The map generator options allow you to import a map, and to set several parameters that influence the size and terrain of a randomly generated map. FreeCol includes several hand-made maps, which can be selected by clicking on the map icon.
To import a map, either select one of the maps in the shortcut panel, enter the name of a file in the import field, or click on the browser button in order to select a file via a file browser. You have the choice to import terrain, bonuses, rumors and settlements. At the moment, the map editor does not provide all these options, however.
The map generator tab allows you to select the size of the map, as well as the amount and the general shape of the land on the map. The terrain generator tab allows you to select the number of rivers, mountains, lost city rumors, native settlements, forests, and bonus tiles on the map, as well as the humidity and temperature of the map. The latter settings will influence the terrain.
The game options allow you to select several parameters that influence game play, such as non-standard rules and victory conditions.
Victory conditions allow you to choose how a European player may win the game:
Please note that if you start a single-player game and select the defeat of all other human players as a victory condition, your game will end immediately, since the victory condition already applies.
The initial price options determine the minimum and maximum initial prices for all goods traded in Europe, as well as the difference between the buy and sell prices. Unless the initial prices for a type of goods are set to the same value, the initial price will be randomized at the beginning of the game. The price spread, however, remains constant.
You can also set the price of hammers when paying for the completion of buildings and buildable units.
The client options panel allows you to customize how your client displays the game objects and how it handles some tasks such as auto-saving.
Beware that some Java implementations have bugs that cause high CPU load and very slow performance if animation is enabled. If this happens, either disable animation or experiment with the -Dsun.java2d.pmoffscreen=false Java command line option.
The FreeCol user interface has been translated into several languages, but not all translations are complete. If the translation you choose is not complete, the missing strings will be taken from another language file. This could be the default translation for your language or the English language version. If you selected Austrian German, for example, missing strings would be taken from the default German translation if available, and the English language version otherwise.
Translations for the FreeCol user interface are kindly provided by translatewiki.net. If you want to improve the translation you use, please get an account at the wiki and contribute. The translation available at the wiki may well be more complete than the one included in the latest FreeCol package, which may be several months old.
If you want to install the latest translation available, go to translatewiki.net and follow the link Special pages from the navigation bar on the left. Scroll down to the section Wiki data and tools and follow the link Translate, which takes you to a list of the projects for which the wiki provides translations. Choose FreeCol to view a form. Select Export translations to file from the dropdown box labelled I want to. Select the language you are interested in and press the Fetch button. Please take note of the abbreviation used for the language, which you will need during the next step.
Now, save the result as a file. Find the directory where FreeCol is installed and open the sub-directory data, then the sub-directory strings, where you will find a large number of files called
FreeColMessages_abbreviation.properties.
Overwrite the file with the correct abbreviation and you are done. The next time you start FreeCol, it will use the updated translation.
You can choose whether to group messages by type, by source, or not at all. The source of the message is a game object, typically a colony or unit, and the type of the message is either the default type, which is always displayed, or one of the following types, which can be turned off:
FreeCol comes with a limited selection of music and special sound effects. The audio options enable you to select the output device, which you should probably leave to be automatically detected, as well as the volume of the music and special effects.
Many but not all of the actions available via the game menu or via orders buttons are also available as keyboard shortcuts. These shortcuts can be configured.
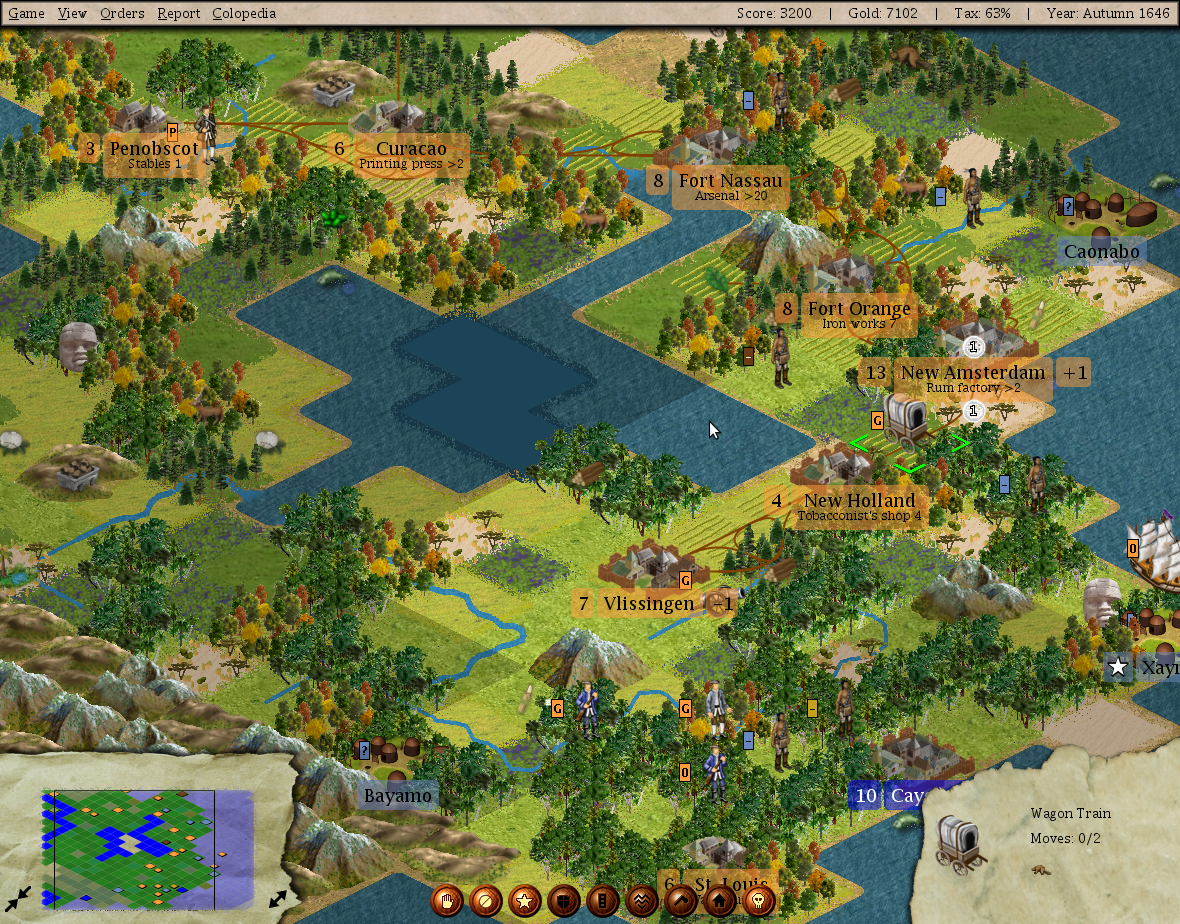
The figure 3.1 represents the main screen.
The main screen consists of up to six different areas: the menu bar at the top, the minimap in the lower left corner, the info panel in the lower right corner, the order buttons between the minimap and the info panel, the compass rose in the top right corner, and the main map in the background. The units, colonies, and so forth can be seen on the main map. They are also represented as coloured dots on the minimap. The preferences menu allows you to disable some of these controls if you wish to do so.
The menubar contains the Game, View, Orders, Report and Colopedia submenus at the left hand of the screen, as well as a status area at the right hand of the screen. The status area displays your score, the amount of gold you possess, your current tax rate and the current turn.
The Game Menu allows you to:
The View Menu allows you to:
The Orders Menu enables you to give orders to the currently selected unit:
Note that not all orders are available at all times. The build colony order is only available if the unit is able to build colonies and the tile it is on will support a colony, for example. The unload order is only available if the unit is carrying goods. You can unload the goods anywhere, but if you are not in Europe or in a colony, the goods will be lost. You can use this feature to dump unwanted cargo in order to avoid the cargo penalty.
The Reports Menu provides access to various reports on the current state of your colonies. In these reports, icons as well as blue text strings link to the places they refer to. If you click on the name of a colony, for example, the Colony Panel will be opened.
The Colopedia Menu provides access to the online game help, which is divided into eight sections:
If you are in unit view mode (the default), the info panel in the lower right corner of the screen either shows information about the currently selected unit, or contains a button to end the current turn if no unit is selected. If a unit is selected, then the info panel shows an image of the unit, as well as its name and the moves it has left. If the unit is a carrier unit, such as a ship or wagon train, the info panel also shows the units or goods on board of the carrier. If the unit is a pioneer, the info panel shows the number of tools the unit carries.
If a unit is displayed, you can click on the info panel in order to centre the map on this unit.
If you are in terrain view mode, then the info panel displays the name, owner, defense bonus, movement cost and potential production of the selected tile. You can switch between view modes by pressing Shift-Ctrl-V, or by using the view menu.
The minimap in the lower left corner of the screen shows you a more abstract view of the map than the main map. Different types of terrain are distinguished by colour, and units and settlements are also represented by dots in the colour of the nation that owns them. You can use the minimap to navigate around the map quickly. Either click on the minimap to center the view on a certain point, or drag the white frame around. Zoom buttons to the left and to the right of the minimap allow you to zoom into and out of the view.
The unit buttons displayed between the minimap and the info panel allow you to give order to your units. Note that not all buttons are always active. A ship can not plow a tile, for example, so the plow button is never active if the selected unit is a ship. The eight buttons have the following functions:
All these actions are also available from the Orders Menu of the menu bar, and as keyboard shortcuts.
The compass rose can be displayed in the top right corner and allows you to give your units movement orders by clicking on the corresponding direction. It is primarily intended for users who do not wish to (or are unable to) use the keyboard shortcuts.
The main map shows you the New World in greater detail. You can see the different types of terrain, forested and otherwise, hills, mountains, rivers, and, of course, the various units and settlements of the native and European players. Sometimes units will be all grey—this shows the position of the unit when you could last see that tile, but does not guarantee that the unit is still there. Left click on a tile in order to center the main map, or on a unit in order to select it (a display option allows you to decide whether the map should always centre on the selected unit, or not).
Your colonies as well as those of your opponents are displayed on the map. You can see their names as well as their sizes, which are displayed as a number and also influence the image used to represent them. The color of the colony’s name is always the color of its owner, but the color of the colony size indicates whether any production bonuses or penalties apply (at normal difficulty):
| Colour | Bonus/Penalty | Requirements |
|
|
|
|
| Red | -2 | more than eight tories |
| Orange | -1 | four to seven tories |
| White | 0 | less than four tories and less than 50% SoL |
| Green | +1 | 50% SoL or more |
| Blue | +2 | 100% SoL |
Left click on a colony in order to open the colony panel. If there is an active unit outside of the colony on the same tile, then a single left click will select the unit instead. In this case, a double click will still open the colony panel.
Right clicking on an empty tile, will either display some information on that tile if no unit is selected, or open a pop-up menu that additionally allows you to send the selected unit to this tile. If the tile contains some of your units, the menu will also enable you to select each of these units. If the tile contains a native settlement, the menu will also provide you with an item that will bring up some information on that settlement. If the tile contains one of your own colonies, the menu will also allow you to open the colony panel.
You can also activate the map scroll by moving the cursor towards the edges of the main map. Scrolling with the minimap is faster, however.
If a unit is selected, further information about that unit is displayed in the info panel, and you can move the unit using the numeric keypad or the compass rose. If you select a unit with the left mouse button and drag the mouse, the main map will display the best path from the unit’s current position to the tile the mouse is hovering over.
The tiles the path consists of will be marked with boots if the unit is on foot, with horseshoes if the unit is mounted, with wheels if the unit is a wagon train, or with sextants if the unit is a naval unit. Full-colour symbols mark tiles that can be reached in the same turn, whereas shaded symbols mark tiles that can be reached only in subsequent turns. A number indicates how many turns later the unit will arrive on this tile. You can see this on the main screen.


Once you release the mouse button, the selected unit will begin to follow this path. It will awake once it has arrived at its destination or if it can no longer follow the path (if a unit belonging to a different player is in the way, for instance). You can also press the middle mouse button, or both mouse buttons if your mouse only has two buttons, in order to give the selected unit a movement order.
In the original Colonization game, a unit always used up all movement points when entering a colony. In FreeCol, this is not the case—a unit can enter a colony just like any other tile. If the unit is placed in a building, or on a colony tile, or if a carrier is loaded or unloaded, however, it will lose all its movement points.
Units are marked with small coloured shields, which may or may not display a letter. The background colour indicates the nation this unit belongs to. The Dutch units, for example, are usually marked with orange shields. The letter indicates the current state of the unit:
If the unit is a foreign naval unit, the shield will display a number instead. This is the number of holds this unit is using.
Indian Settlements display at least two shields: The colour of the first shield indicates the nation this settlement belongs to. A * on this shield indicates that this settlement is the nation’s capital, a - that it is not. The second shield, which bears an exclamation mark (!) if you have visited the settlement, and a question mark (?) if you have not, indicates the current relations between the nation and your colonists. Its background may be green, blue, yellow, orange or red, depending on whether your relations are good, mediocre or bad.
A Settlement with a European mission displays a third shield bearing a cross on a black or grey background. The colour of the cross indicates the European nation that established the mission. The background of the shield is black if the mission was established by a Jesuit Missionary, and grey otherwise.
The preferences menu allows you to select “modern” colony labels instead of these “classic” labels. The modern labels display the same information, but in a slightly different way.
The order buttons represent some of the orders you can give to your units. You can move your mouse over the buttons to see their respective orders. If a unit is unable to perform a certain action, the corresponding order button will be disabled. The orders are also available from the Orders Menu, and you can use the following keyboard shortcuts:
You can customize these settings in the preferences dialog.
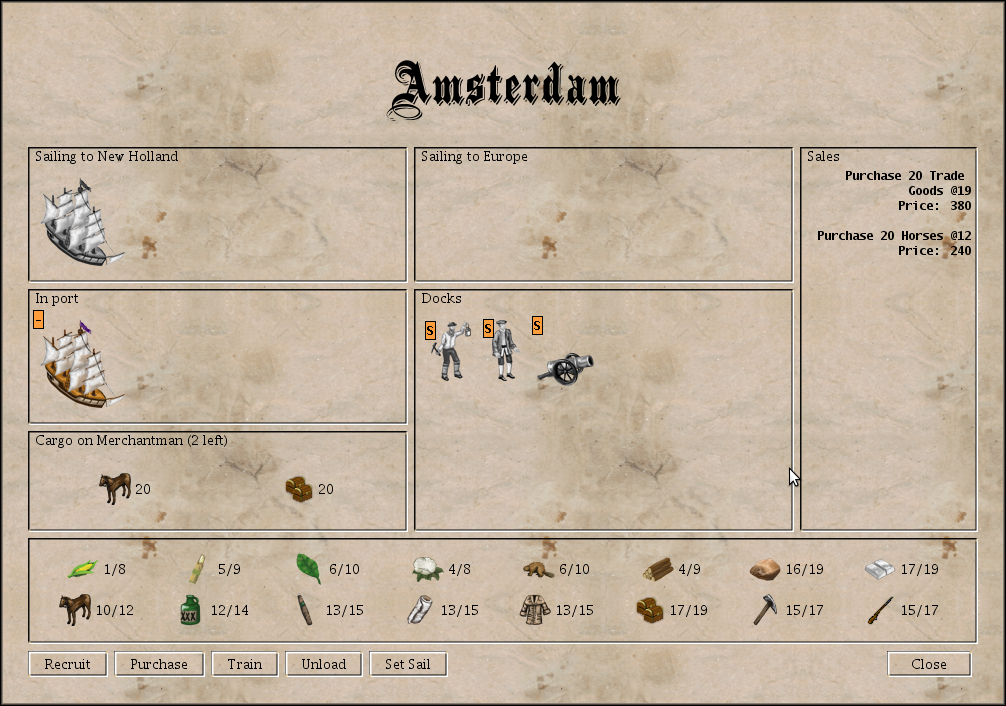
The figure 3.2 represents the Europe panel.
In this panel, you can control the ships sailing between America and Europe, as well as the ships currently docked in Europe. You can also buy goods, recruit, purchase and train units. Units recruited, purchased or trained are visible in the Docks Area in the Europe panel.
If a ship has set sail for Europe or America, you can change its direction by dragging it from the Going to America box to the Going to Europe box (or vice versa).
If a ship has docked at the European port you can drag and drop units between the Docks and Cargo panel. You drag and drop goods between the Cargo panel and the Market panel. If you want to buy or sell less than 100 units of goods, press the shift key while dragging. This will allow you to specify how many units you wish to transfer. If you press the “Unload” button, all goods will be unloaded.
If any of the goods are displayed in grey, this means they are being boycotted by the Crown because you refused a tax raise. You must pay your tax arrears before you can trade these goods. You can do this by dragging the goods as usual, in which case you will be given the chance to pay your tax arrears (provided you have enough money). A small area at the top right of the screen will keep track of how much money you made or spent and how much taxes you paid.
From time to time, new colonists eager to join you in the New World will appear on the European Docks. If you are unwilling to wait, you can also recruit new colonists by paying for their journey to the New World. Alternatively, you can train expert units at the Royal University. Paying for their education is expensive, however, and not all types of experts are available in Europe.
Units present in Europe can also be armed, mounted, equipped with tools or blessed as missionaries in Europe. In order to select one of these actions, you need to right click on the unit. Note that you will have to pay for the arms, horses or tools required to equip your units. Blessing a missionary, however, is free.
In order to send a ship back to the New World, you must drag it to the Going to America section of the Europe panel, or press the “Set sail” button.
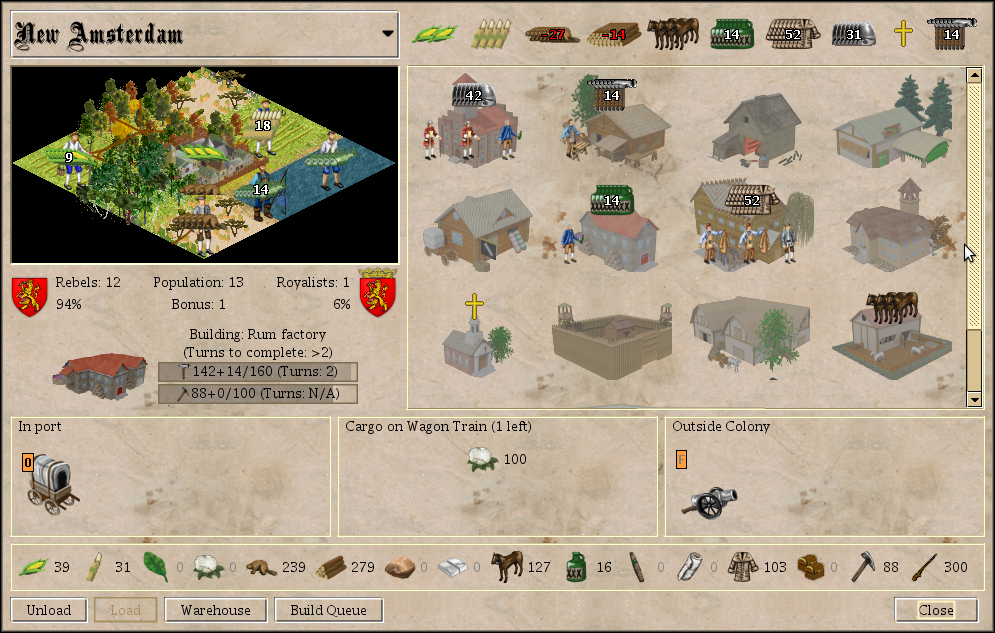
The figure 3.3 represents the Colony panel.
To view a colony’s panel, left click on it from the main screen. In this panel, colonists can be assigned to cultivate tiles surrounding the colony, to work in buildings, defend the colony against attackers or wait outside of the colony.
The select box at the top left of the panel displaying the name of the colony can be used to select a different colony. You can also use the “left” and “right” keys to “scroll” through your colonies. Next to the colony’s name, the production panel shows all the goods your colony is producing.
Below colony name, you can see the area surrounding the colony to the left and a scroll pane displaying the buildings of the colony to the right. You can drag and drop a unit on a tile or a building. Buildings only ever produce a single type of goods. The tiles surrounding the colony can produce several kinds of goods, however. If the unit is not producing the right kind of goods, you can right click on the unit to select a different kind of work. If a tile has a red border, then it can not be used—it is either assigned to another colony or settlement, or is occupied by a hostile unit, or is a water tile which can not be used until you have built docks. Note that if you drag a unit onto a tile owned by the natives you may be offered the chance to purchase the land.
Below the surrounding area, you can see the population panel, which displays the size of your colony, the number and percentage of colonists that support independence, the number and percentage of colonists that support the crown, as well as the current production bonus.
Below the status panel, the port panel shows you any ships or wagon trains in the colony. If there is at least one unit present, the cargo panel below the port panel shows you the cargo of the selected carrier (if any).
On the right hand side of the panel, you can see the buildings panel, which displays an image for every building in the colony, as well as the building or unit currently being built. You can see the units working in a building, as well as its production. If you let the mouse hover over a building, you can see a slightly larger and more detailed view. You can click on any building in order to open the build queue dialog, which enables you to create a list of units and buildings to build.
Below the buildings panel, the outside colony panel shows you which colonists are present on the same tile, but are not working inside the colony. Any units shown here are able to defend the colony against attacks.
Below this panels, you can see the colony’s warehouse area. You can drag and drop goods from the warehouse to the cargo panel and vice versa in order to load and unload your ships or wagon trains. Press the shift key while selecting goods if you do not wish to select all the goods present, or less than one hundred units.
The Warehouse can only hold a certain amount of goods of each type. Its initial capacity is limited to 100 units of each type of goods, but it can be increased to 300 by building two Warehouse Expansions. If the current limit of the warehouse is exceeded, the number of goods is printed in red. If you do not store the excess units elsewhere, they will be lost at the end of the turn.
If you have already built a Custom House in the colony, you can export goods to Europe automatically. Goods marked to be exported are printed in green. Open the warehouse dialog (see below) in order to change export settings.
At the bottom of the Colony Screen, you will see a row of buttons, not all of which are always active. These buttons will allow you to
You can drag and drop colonists to and from buildings, tiles surrounding the colony, ships and the area outside of the colony. You can also use the right click menu of any unit to assign it to a work place, equip it, or place it outside of the colony (unless it already is outside of the colony).
The warehouse dialog allows you to set the warning levels for all types of goods. If you have turned on the warnings about goods levels, you will receive a warning if the number of goods drops below the lower level or rises above the higher level. In a warehouse with a capacity of 100 units of each type of goods, the lower level is set to 10 and the higher level is set to 90 by default.
The export level allows you to specify how many goods should be kept in reserve if goods are automatically exported from this colony, either through the Custom House, or by a carrier following a Trade Route. A checkbox indicates whether this type of goods should be exported through the Custom House or not. If you have not yet built a Custom House in this colony, the checkbox is disabled.
Clicking on a building (not one of the units working in the building) opens the build queue panel, which allows you to select which items the colony should build. The panel consists of three sub-panels, the unit panel on the left, the buildings panel on the right and the build queue in the centre. You can drag and drop items from the unit panel and the buildings panel to the build queue and back. You can also double-click an item in the unit panel or the building panel to add it to the build queue, and you can double-click an item in the build queue to remove it. Right-click an item to see its entry in the Colopedia.
The panel contains a checkbox that switches between the compact view, which shows only the names of the buildable items, and the icon view, which also shows the goods required to build each item. Another checkbox allows you to see items that the colony can not build at this time because it lacks the necessary population, or because some other requirement has not yet been met. You can also add these items, which are marked with a small lock icon, to the build queue, but not as the head of the queue.
The “buy building” button allows you to buy the building at the top of the build queue, provided that you have enough gold.
The FreeCol user interface can be customized to a certain degree. In the directory where FreeCol is installed, you will find a sub-directory called data, which contains configuration files and multimedia assets. These include the images used to represent units, goods, buildings and various other objects that appear in the game, sounds to play when certain events occur and so forth. You can replace them if you wish.
The sub-directory data/base/ contains assets that are used for the user interface in general, independent of the rules used for a particular game. The sub-directory data/base/resources/fonts contains several fonts that are distributed with FreeCol, including the file ShadowedBlack.ttf, which contains the black letter font used to display headlines and the titles of panels. The file data/base/resources.properties allows you to configure how the assets are used.
The line
NormalFont=urn:font:Serif-PLAIN-13
for example, selects the font called “Serif” with font style “plain” and font size 13. Instead of “Serif”, you could use any other font that is known to the Java Virtual Machine of your system. In general, this includes all fonts installed by the operating system (rather than individual applications).
Please note that FreeCol uses a Uniform Resource Identifier (URI) to identify the font. For this reason, you must obey the usual quoting rules. In particular, you must use the string %20 instead of a space character in the font name.
Alternately you can also use fonts that are not known to the JVM. You can copy it to the fonts directory mentioned above and add it to the configuration file by adding a line like this:
MyFavouriteFont=resources/fonts/Chancery.ttf
Then you could say:
NormalFont=urn:font:Black%20Chancery-PLAIN-13
Instead of MyFavouriteFont, you can any key you like, as long as it is not being used for anything else. This line will add your font to the list of fonts known to the JVM, and you can then use its name, which is, however, likely to differ from the file name. The file Chancery.ttf, for example, contains a font called “Black Chancery”.
At the beginning of the game, you will start with a naval vessel and two colonists. Your first task will be to discover the New World, which should lie due West, although sailing North West or South West may prove quicker. As soon as you have discovered land, you can establish your colonies and produce goods to send home to Europe.
There are many different types of terrain in the New World, each with its own peculiar advantages. At the beginning of the game you will probably arrive at a High Seas tile (or at the edge of the map). High Seas tiles (and the map edge) allow you to sail between Europe and the New World. As you approach land, the High Seas will be replaced by Ocean tiles, which produce Fish.
In the New World, you will also discover Plains, which produce a great deal of Grain, a lesser amount of Cotton, and some Ore; Grassland, on which Grain and Tobacco can be cultivated; Prairie, which are suitable for growing Grain and Cotton; Savannah, which produces Grain and Sugar; Marsh, where Grain can be cultivated and some Ore can be mined; Swamp, which yields some Grain, and small amounts of Sugar, Tobacco and Ore; Desert, which produce some Food, Cotton and Ore; as well as Tundra, where Grain can be grown, and some Ore can be mined.
Large parts of the New World are covered in forests, all of which yield varying amounts of Grain, Lumber and Furs. The Boreal Forest also produces Ore, the Mixed Forest Cotton, the Conifer Forest Tobacco, the Tropical Forest Sugar, the Rain Forest produces small amounts of Ore, Sugar and Tobacco, the Wetland Forest and the Scrub Forest yield some Ore, and the Broadleaf Forest Cotton.
The Hills produce a small amount of Grain, and can be mined for Ore and a lesser amount of Silver. The Mountains are unsuitable for agriculture, but yield some Ore and Silver. Arctic tiles are the least useful type of terrain, as they produce nothing at all. Terrain types that produce no Grain, such as the Mountains and Arctic types, can not support colonies.
Clearing or plowing a tile, and building a road require spending 20 tools. Therefore, these actions can only be carried out by units carrying at least 20 tools. You can equip your units in your colonies or in Europe.
The New World produces many goods, which can be traded in Europe. In order to this, you must use your ships to transport them to your Home Port. As soon as the ship arrives in Europe, you can sell the goods, and buy others, in the Europe Panel. Later in the game, after you have built Custom Houses, goods can be exported automatically. Until then, you can partially automate this process by establishing Trade Routes.
Exporting these goods to Europe will be one of your most important sources of income. At the beginning of the game, you will probably want to export raw materials, such as Sugar and Tobacco, but as prices drop, you should concentrate on luxury products, such as Rum and Cigars, which command higher prices.
Food is the single most important good, since all your colonists consume two units of food each turn. If this demand can not be met, some of your colonists will starve to death. On the other hand, a colony that has accumulated 200 units of food will produce a new Free Colonist. Unfortunately, buying food in Europe is always expensive, and colonial foodstuffs fetch only poor prices.
Food is produced from two basic food stuffs, Grain, which can be cultivated on nearly all land tiles, and Fish, which is produced by ocean and lake tiles. To harvest the bounty of the sea, you will need a Dock, however.
Horses are special in several ways. Horses will survive by grazing in your colonies’ Pastures, but in order to reproduce they require grain, and there have to be at least two of them. Horses live in herds, and each herd produces no more than two new horses per turn. In the Pasture, a herd consists of fifty horses, but in the Stables, a herd consists of only twenty-five horses, effectively doubling the number of horses you can breed per turn (provided you have enough food).
The number of horses you can breed is further limited by the fact that horses feed only on grain and not on fish. And Pastures and Stables consume no more than half the food surplus available. In other words, you can not breed more horses by filling your colonies’ warehouses with grain.
Four raw materials are typical for the New World. They will initially generate a good income, but prices will inevitably drop. These goods are Sugar, which is best cultivated on Savannah tiles, Tobacco, best cultivated on Grassland, Cotton, which is most abundant on Prairie tiles, and Furs, which are available on all forested tiles, but most abundantly on Boreal Forest and Mixed Forest tiles.
These four materials can be used to produce corresponding luxury goods, which will fetch much higher prices in Europe. In a distillery, Rum is produced from Sugar. Tobacco is used to make Cigars in the Tobacconist’s House. The Weaver weaves Cloth from Cotton in his house, and the Fur Trader turns Furs into Coats in his house.
Initially, the resource which fetches the highest prices in Europe is Silver, which can be mined in the Mountains. Small amounts of silver can also be produced on Swamp and Marsh tiles with a minerals resource.
As prices drop, Silver will become less and less useful, however. On the other hand, Hills and Mountains also produce Ore, which is not in great demand in Europe, but which can be refined to produce Tools in the Blacksmith’s House. Tools are required for clearing forests and plowing fields, as well as for constructing advanced buildings and units. Furthermore, Muskets can be produced from Tools in the Armory.
Lumber also fetches poor prices in Europe, but can be used to produce Hammers in the Carpenter’s House. Hammers are required for constructing all buildings, as well as naval units and Wagon Trains. Hammers are “abstract” goods that can neither be transported nor traded. They represent the work required to finish a building rather than some tangible material.
The two other “abstract” goods are Liberty Bells, which are produced in the Town Hall, and Crosses, which are generated by the Church. They represent the concepts of liberty and of religious freedom. Liberty Bells produce liberty points, which are needed to convince your colonists of your policies, and to elect Founding Fathers to the Continental Congress. Crosses generate immigration points, which are needed to attract further immigrants in Europe.
Trade Goods, on the other hand, can be transported and traded, but they can not be produced in your colonies. They are only available in Europe and are useful for trading with native settlements, which generally demand Trade Goods.
The orders menu allows you to assign a Trade Route to a ship or wagon train. If you select this order, the trade route dialog, which enables you to select a trade route or create a new trade route, will open. If you have not created a trade route, you must use the edit trade route dialog to do so first.
A trade route consists of two or more stops, which may either be the Home Port, or one of your colonies. Select a destination from the select box and press the add new stop button. If you select the special destination all colonies, then your Home Port and all your colonies will be added to the list of stops.
If you have selected a destination, you can drag and drop goods from the goods panel to the cargo panel. These are the goods your ship or wagon train should have on board when leaving this stop. If the ship or wagon train arrives at the destination with other goods on board, these goods will be unloaded.
Note that the ships and wagon trains will take the capacity and settings of the warehouses in your colonies into account. They will not unload cargo that would be wasted and they will only load goods that should not be kept in reserve. This means that they may wait for a long time until a sufficient number of goods becomes available.
As soon as a ship or wagon train reaches the last destination of the trade route, it will continue at the first destination.
The behaviour of trade routes can sometimes be confusing. To see exactly what each unit with a trade route is doing, enable the Goods Movement message type, but beware that there can be many messages of this type.
Some types of terrain can also have special resources, which increase the production of a particular type of goods. Most of these resources look just like the goods they will produce. These tiles are particularly valuable.
The New World is by no means an uninhabited country. Various tribes of Indians already live there, and make use of the land. When your colonists arrive, you will have to decide whether you will attempt to peacefully coexist with the natives, or to wage war. Beware that their culture is unlike that of Europe, and whenever your peoples come into contact there is a tendency for misunderstandings and offence, which manifests in increasing tension and eventual violence. Native chiefs are often well-intentioned, but do not completely control their hot headed warriors, so be alert for raids from even nominally peaceful settlements.
The native culture is strongly conservationist, which means that building colonies and improving the surrounding lands will inevitably cause some degree of alarm. The further your colonies are from native settlements, the less alarm they cause, and doubly so for the native capital. Similarly, the larger your colonies get, the greater the alarm caused.
The French player has the advantage of generating only half the alarm among the natives. The Spanish player has the advantage of greater military efficiency against the natives. Your choice of Home Country may influence your strategy— or vice versa.
Small Native Settlements use the tile they are built on and all the adjacent tiles, just like your Colonies do, and possibly more nearby tiles. Large Native Settlements also use tiles that are two moves away, and possibly more. If the settlement is a nation’s capital its radius is also increased. Every native settlement is marked with a small rectangle containing either a ‘-’ for a normal settlement or a ‘*’ for a capital, on a background of the native nation colour.
Your colonists can not use tiles that are already used by natives. If they attempt to do so, the natives will demand some gold for the land. You must then decide whether to pay their price, take the land away from the by force, or to leave the land alone. Naturally, the natives will not be pleased if you take the land away from them. As soon as Peter Minuit has joined the Continental Congress, however, the natives no longer demand payment for their land nor become immediately displeased if it is taken. Note though that every tile you own makes your colony look more threatening.
A special case exists for the center tile of the colonies you found. In the “classic” ruleset and/or by default in when playing under the “Very Easy” difficulty level the center tile does not have to be paid for. “Easy” difficulty restricts this to only apply to a single colony, “Normal” to a single colony and requires the tribe you are stealing land to have not been contacted, and other levels require payment as usual.
Armed units near their settlements will alarm the natives and poison your relations. If the natives are happy, they will come to your colonies offering gifts. If they are unhappy, they will come and make demands instead. If they get really angry, they may attack your units or colonies. After a few turns, however, they will usually calm down again.
Some types of units may enter Native Settlements. Units that carry goods, such as Wagon Trains and Ships, can enter the settlements and trade with them. Trade always improves your relations with the natives. If you offer your goods as a gift, this will improve your relations even more.
Scouts can either ask to speak with the chief of the tribe, or demand tribute, which is obviously not good for your relations with the natives. If your scout speaks with the chief, you will learn which skill this settlement teaches and which goods the natives would prefer to acquire. Furthermore, the chief may offer you some gold, or tell you about nearby lands. If your Scout is not a Seasoned Scout already, he may become so. Scouts are always welcome to revisit friendly settlements which will update the skill and goods information, but the special benefits are only available to the first scout (of any nation) that visits (or any unit, if the “Chief contact” option is set). Settlements which are unscouted to the best of your knowledge are decorated with a dollar sign on the settlement tile popup and Indian Advisor.
Free Colonists and Indentured Servants may enter a settlement in order to learn the skills of the natives.
Missionaries, which may be either Jesuit Missionaries or ordinary colonists blessed as missionaries in the Home Port or any colony with a Church, are able to establish a Mission or to incite the natives against another European nation. If a Jesuit Missionary, or an ordinary colonist blessed as a missionary is equipped with tools, muskets or horses, he loses his missionary status and is no longer able to establish a mission.
The presence of a Mission will reduce tension between the natives and your colonists. In time, some of the natives may also convert and join your colonies as Indian Converts. If the settlement already contains the mission of another European country, your missionary may denounce the teachings of that mission as a heresy. If he is successful, the natives will burn down the old mission and your missionary establishes a new one.
Note that the missionary will always remain in the settlement. He is effectively lost to you. The presence of a mission is shown by a second small rectangle with a cross on it. A black cross denotes an expert missionary, and the background colour of the rectangle is that of the nation that created the mission.
There is also a third rectangle shown on native settlements that you have contacted. This will contain an exclamation mark if your scouts have visited it and spoken to the chief, or a question mark if it has been contacted in some other way. The background colour will be that of the nation that is causing that settlement the most alarm. If your nation is the most alarming, the rectangle may be partially filled, giving a rough measure of the amount of alarm you have generated.
Good native relations are most helpful at the start of the game when you have relatively few military units. As the game progresses the natives pose less of a threat, due to your colonies becoming more heavily fortified and defended by artillery (artillery is particularly effective against native raiders). It usually takes many years before all out war breaks out with your neighbouring tribes, but it is very difficult to completely avoid.
In the New World, there are also rumours about Lost Cities, such as El Dorado, or Cíbola. The natives do not explore these sites, but your colonists can and, in fact, must do so if they enter a tile with a Lost City Rumour. It is not possible to farm a tile with a Lost City Rumour on it.
Mostly, the rumour proves to be nothing but a rumour. Occasionally, you might disturb the burial grounds of a native tribe, which will cause the tribe to declare war on you. It is also possible that your expedition simply vanishes without a trace.
On the other hand, you might also discover a small tribe and a few trinkets. Your colonist might become a Seasoned Scout if he has no other skill, you might discover the sole survivor of a lost colony, or even one of the Seven Cities of Gold, and a Treasure Train.
Possibly the best outcome is the discovery of the Fountain of Youth, which will cause numerous colonists to appear on the docks in your Home Port.
As soon as Hernando de Soto has joined the Continental Congress, Lost City Rumours never yield negative results.
The original Colonization game awarded exploration points only for the discovery of the Pacific Ocean. This is also the default behaviour for FreeCol. However, you may choose to play with exploration points, in which case you will be awarded exploration points for the discovery of a new region of the New World.
A region may be either a large area of land, a mountain range, or a river valley. If you discover a region, you will be asked to name it, and you will be awarded a number of exploration points depending on the size of the region discovered.
Your colonies are your most important assets in the new world. Therefore, it is very important to build them in the right place. There are several aspects to consider:
The tile your colony is built on is special in several ways. It is the only tile that produces more than one type of goods at the same time and neither requires nor allows the presence of a colonist to do so. On the other hand, you can not choose which types of goods to produce. The colony tile will always produce some kind of food as its primary product, and some raw material other than lumber or silver as its secondary product. The production of food can be increased by plowing the colony tile, but the secondary production will not benefit from artificial tile improvements such as fields and roads. It will, however, benefit from natural tile improvements such as rivers and resources.
Some terrain types are more suitable for establishing a colony than others. Colonies can not be built on Arctic tiles, nor on Mountains, because these terrain types produce no Grain. Hills and Deserts are less suitable than other tiles because they produce less food, which is very important in the long run. Tiles with forest generally produce less food than tiles without, but Pioneers are able to cut down the forest and plow the tile, which will increase food production. The presence of a river will also increase food production.
The Hills produce a small amount of Grain, and can be mined for Ore and a lesser amount of Silver. The Mountains are unsuitable for agriculture, but yield some Ore and Silver. Arctic tiles are the least useful type of terrain, as they produce nothing at all. Terrain types that produce no Grain, such as the Mountains and Arctic types, can not support colonies.
The New World is also irrigated by minor and major rivers. The production of most types of Goods is increased by the presence of rivers as well as roads, which your Pioneers can build. All terrain types which produce Grain (except the Hills) can also be plowed by your Pioneers in order increase grain production. If the tile is forested, you must first clear the forest and transform the tile into open land:
| Forested → | Cleared |
|
|
|
| Boreal Forest → | Tundra |
| Mixed Forest → | Plains |
| Conifer Forest → | Grassland |
| Tropical Forest → | Savannah |
| Wetland Forest → | Marsh |
| Rain Forest → | Swamp |
| Scrub Forest → | Desert |
| Broadleaf Forest → | Prairie |
| → |
In the early stages of the game, you will need to generate cash by selling products from the New World in your Home Port. Thus, many of your early colonies should probably be situated next to bonus tiles, which greatly increase production. Rivers also increase production, though not as much as a bonus resource. On the other hand, they increase the production of many different kinds of goods, unlike a bonus resource.
In order to improve your colony, you will have to construct various buildings. This will require large amounts of lumber. For this reason, you should make sure that at least one tile adjacent to your colony site can produce sufficient amounts of lumber. You will also need tools to construct advanced buildings. Therefore, it is an advantage if the colony can also produce ore, which can be refined to produce tools. However, ore is not as important as lumber.
Some of the tiles may be owned by other European powers, or claimed by Indians. Building a colony too close to other settlements is not a good idea, unless you plan to conquer or destroy these settlements. Keeping your own colonies close together is a good strategy, however, as long as you avoid sharing tiles between several colonies as far as possible.
You can order your pioneers to cut down forests near to your colonies. This will increase the food produced on these tiles, and cause a large, one-off amount of lumber to be delivered to your nearest colony. Under the usual rules, a tile will never produce lumber again once cleared. However, the “Plant forest” mod, distributed with FreeCol, allows reforestation by your pioneers.
The efficiency of the local governments of your colonies depends on the colonists’ support for the Sons of Liberty. If more than 50% of the colonists support the Sons of Liberty, they all produce one additional unit of goods, and if support for the Sons of Liberty increases to 100 %, they even produce two additional units. Colonies which have room for more colonists without reducing the production bonus are distinguished on the map by the colony size appearing in italic font.
On the other hand, if the number of Tories exceeds a certain number which depends on the difficulty of the game (4 colonists by default), their production decreases by one unit, and if it exceeds this limit by four colonists, their production is decreased by two units. This waste may well destroy your colony and should be avoided at all costs.
In order to prevent this kind of mismanagement, you need to increase the support for the Sons of Liberty. You can do this by producing Freedom Bells in the Town Hall.
A newly established colony already includes several buildings, namely a town hall, a carpenter’s house, a blacksmith’s house, a tobacconist’s house, a weaver’s house, a distiller’s house, a fur trader’s house, and a warehouse. You can improve your colonies by upgrading all of these buildings except the town hall, and by constructing various new buildings. However, many buildings can only be constructed in colonies of a certain size, or after certain Founding Fathers have joined the Continental Congress.
The craftsmen’s houses can be upgraded to workshops, which produce twice as many manufactured goods. After Adam Smith has joined the Continental Congress, workshops can be upgraded to factories, which are more efficient and generally produce one and a half units of manufactured goods from each unit of raw material. While the town hall itself can not be upgraded, the production of Liberty Bells can be boosted by constructing a printing press and then a newspaper.
The following buildings are all present in every newly established colony:
The following eight buildings are not part of your basic colony and have to be constructed later:
Some buildings have an immediate effect. The Stockade, for example, provides protection for your colony, and the Docks enable your colonists to go fishing. The effects of these buildings can not be increased by workers.
Most buildings do nothing if they are unoccupied, but provide workers with a place to produce manufactured goods. The Tobacconist’s House, for example, allows colonists to make Cigars from Tobacco. Place one or more colonists in a building in order to convert raw materials to manufactured goods, which can be sold for higher prices. For each building, there are expert units that work more effectively than Free Colonists. Other units may work less effectively.
5.4 Building Units and Buildings
In order to upgrade buildings, and to construct new buildings and certain kinds of units, such as Artillery and ships, you will need to produce Hammers, which represent work being done. Hammers are made from Lumber, so you need to produce lumber, either by cutting down forests, or by placing a colonist on a forested tile next to your colony and ordering him to work as a lumberjack (right click on the unit to give it orders). Then you can place a colonist in the Carpenter’s House in order to convert the lumber to Hammers.
Units and advanced buildings also require Tools, which are made from Ore. So you need to place an ore miner on a tile that produces ore (Hills, for example) and another in the Blacksmith’s House, in order to convert the ore into tools.
Your Home Country is a European monarchy and colonial power. The original game featured four playable nations, namely Spain, France, England and the Netherlands. FreeCol optionally adds Portugal, Denmark, Sweden and Russia.
Virtually all players agree that the addition of Portugal corrects a glaring omission of the original game, but the other three European nations are controversial. Sweden, Denmark and Russia all had colonies or territories in the Americas, but were either minor colonial powers or arrived very late. However, as we wished to make multi-player games with up to eight human players possible, we had to add further nations. We might well change the selection at some later date, and you can change the selection by editing the rules yourself.
Each of these countries may have special abilities and different starting units. In the original game, these abilities and units were tied to particular nations. FreeCol, however, optionally allows you to select your national advantage.
At the moment, FreeCol defines the following eight advantages, and also allows you to select no advantage at all:
In the original game, the Dutch had the trade advantage, the French had the cooperation advantage, the English had the immigration advantage and the Spanish had the conquest advantage. In FreeCol, this is also the default, although you can optionally select different advantages. By default, the Portuguese have the naval advantage, the Swedish have the building advantage, the Danish have the agriculture advantage and the Russians have the fur trapping advantage. This is likely to change in the future, however.
The Home Port is a port city in your home country, where you can trade Goods, and train, recruit and buy Units. If you have not built a Drydock in any of your colonies, your damaged ships will also return to the Home Port for repairs.
As you generate Crosses in your colonies, colonists will appear at the docks of the Home Port. Unless William Brewster has joined the Continental Congress, many of these colonists will be Indentured Servants and Petty Criminals. Once William Brewster has been elected, these units will no longer appear at the docks, and you will be able to select the next colonist to emigrate from the recruitment list.
The recruitment list is a list of three colonists who are thinking about emigrating to the New World, but have not yet reached a decision. You can recruit them by offering gold as an incentive. At the beginning of the game, this is a good way of increasing the population of your colonies. However, the amount of gold required will greatly increase during the game.
If you have enough gold, you can also train colonists at the Royal Academy. In exchange for the education you provide, they will also emigrate to the New World. Not all types of colonists can be trained at the Royal Academy, however.
Ships and Artillery can also be purchased in the Home Port. You can also build these units in your colonies, as soon as you have built a Shipyard and an Armory, respectively.
For further information about the actions available in your Home Port, please refer to the section on the europe panel.
Your Home Country is ruled by a Monarch whose actions can have a profound influence on your colonies and your relations to other nations present in the New World.
From time to time, the Monarch may decide to raise the Taxes you pay on all goods you sell in the Home Port. You may refuse to accept these taxes, however, in which case your colonists will stage a protest similar to the Boston Tea Party and throw some goods into the harbour. The Monarch will not be amused and will boycott this type of goods. This means that you will no longer be able to trade these goods in the Home Port until the Boycott is lifted.
You can end a Boycott by paying the outstanding tax arrears. As soon as Jacob Fugger II joins the Continental Congress, all Boycotts will be lifted, but the Monarch may declare further Boycotts later on. As soon as Peter Stuyvesant joins the Continental Congress, you will be able to build Custom Houses in your colonies. The original Colonization game contained a bug which made the Custom House ignore all Boycotts, and this behaviour is available as a rule variant (see ignoring boycotts).
Naturally, the Monarch does not trust your colonists, some of which are nothing but Petty Criminals, and some of which even support the infamous Sons of Liberty. For this reason, the crown maintains the Royal Expeditionary Force, which is to put an end to insurrections in the New World. From time to time the Monarch may inform you that further units have been added to the Royal Expeditionary Force, just so that you don’t get any ideas.
The Monarch may also declare war on any nation present in the New World, both European and native. This will also affect your relations with this nation, unless Benjamin Franklin has already been elected to the Continental Congress. In this case, the Monarch’s wars do not affect you anymore, except that the Monarch may still use the war as an excuse to raise your taxes.
If you are already at war with some nation, either due to the Monarch’s actions, or your own, the crown may offer you some cheap Mercenaries. If you agree to their price, these units will appear at the docks in your Home Port, ready to set sail for the New World.
Several dozen different units are available in FreeCol, but not all units are available to all players. Some units are available only to Indian Players, some units are only available to European Players, and other units are available only to the Royal Expeditionary Force.
The most basic unit of the European Players (including you) is the Free Colonist. The Free Colonist is quite good at any task, but has no special skills. At the beginning of the game, many of the colonists will not be volunteers, but Indentured Servant, or Petty Criminal, who are deported to the New World. Indentured Servants are pretty bad at all jobs within the colony, but just like Free Colonists, they can be sent to native villages to learn a skill from the natives. Petty Criminals are very bad at all jobs within the colony and can not learn anything from the natives. However, both Indentured Servants and Petty Criminals can become Free Colonists through Education.
Many early colonies failed due to a lack of food. In order to avoid a similar fate, you must ensure adequate food production from the very beginning. All your colonists can produce some amount of food, especially on the more fertile terrain types, but the Expert Farmer and the Expert Fisherman will greatly increase your food production. But note that the Expert Fisherman requires a Dock to moor his boat to, and that this requires at least one ocean tile adjacent to your colony.
Four types of units are not available in Europe because they posses skills that can only be learned from the native population. These are the Master Sugar Planter, the Master Cotton Planter, the Master Tobacco Planter, and the Expert Fur Trapper. These units are able to greatly increase your production of Sugar, Cotton, Tobacco, and Furs, respectively.
In the beginning of the game, you will most likely export a great deal of these goods to Europe, but beware, prices will drop! However, all the raw materials of the New World can be used to produce luxury goods that will sell for higher prices in Europe. Sugar can be used to distill Rum, Cotton can be used to produce Cloth, Cigars are made from Tobacco, and Coats are made from Furs. All your colonists can do this, but the Master Distiller, the Master Weaver, the Master Tobacconist, and the Master Fur Trader are the experts who will really rev up your production.
The New World also has two mineral resources, Ore and Silver, to offer. Again, all your colonists are able to mine these resources to a certain extent, but you will need the Expert Ore Miner and the Expert SilverMiner to make the most of them.
Lumber can be produced in all forested tiles, and can also be exported to Europe, although prices are low. However, you will need vast amounts of lumber in order to upgrade your colonies, and no colonist is more skilled at cutting down forests than the Expert LumberJack. Nor is any colonist more skilled at turning the lumber into buildings than the Master Carpenter.
The more advanced buildings you can construct in your colonies require not only lumber but also Tools, which are produced from Ore. This is the job the Master Blacksmith excels in. Tools are also used by your Pioneer to clear forests, to plow fields and to build roads, but none of your other colonists can match the outdoors skills of your Hardy Pioneer. And finally, Tools are required for the production of Muskets, a demanding task best left to the Master Gunsmith.
All your units are able to explore the New World, but the colonist most suited to this dangerous endeavour is the Scout, a mounted colonist. A Scout may become a Seasoned Scout through experience, either by visiting native settlements, or by investigating Lost City Rumours. The Seasoned Scout is much more skillful at these jobs, but beware, they are dangerous!
Another colonist able to visit native settlements is the Missionary. Any colonist can be converted to a Missionary by blessing him in a colony with a Church, or in the Home Port, which is sure to have several churches and maybe even a Cathedral. Missionaries are able to establish a Mission in the native settlement, and to convert the natives. The Jesuit Missionary, however, is much more accomplished at the job.
The converted natives may join your colonies as Indian Converts. They are unskilled at all jobs within the colony, but more skilled than your Free Colonists at producing food and New World Goods such as sugar, tobacco, cotton and furs. Indian Converts can not be upgraded through Education, but they become Free Colonists as soon as Bartolomé de las Casas joins the Continental Congress.
Many colonists come to the New World in search of religious freedom. Thus, they desire a Church in which to preach and pray. This religious freedom, which attracts more European colonists, is represented by Crosses. Naturally, some colonists are more eloquent and inspired than others, and the most famous of these are known as Firebrand Preacher.
While the preachers are concerned with the spiritual welfare of the colonists, the colonists concerned with the secular welfare of their fellow citizens meet in the Town Hall, which generates Liberty Bells. The most dignified and influential of these citizens are considered Elder Statesman.
Any colonist can be equipped with Muskets, which makes him a Soldier, or a Dragoon if he is mounted. However, combat-hardened Veteran Soldier and Veteran Dragoon are much more effective. A dragoon that is beaten in battle is downgraded to a soldier. A beaten soldier becomes an unarmed colonist.
On the other hand, any soldier or dragoon that wins a battle may be upgraded. A Petty Criminal will be upgraded to an Indentured Servant, an Indentured Servant will be upgraded to a Free Colonist, and a Free Colonist to a veteran unit. Veteran units may be further upgraded to Colonial Regular or Colonial Cavalry, but only after the Declaration of Independence.
Artillery is most effective at attacking and defending colonies and fortified units, but is also very vulnerable in the open. Artillery may become damaged, which decreases its efficiency. Damaged Artillery is still quite powerful, but it can not be repaired, and further damage will destroy it.
The Wagon Train, which has to be built in one of your colonies, can be used to transport up to 200 units of goods over land and to trade with native settlements, and foreign colonies if Jan de Witt has joined the Continental Congress. There is a limit on the number of wagon trains you can build— it may not exceed the number of colonies you have (plus the “Settlement limit modifier” game option which defaults to zero).
The Treasure Train is similar to the Wagon Train, but is used only to transport treasures. You can find these treasures in Lost Cities, or in the ruins of native settlements you have destroyed. If you move your Treasure Trains into a colony with access to the sea, your Monarch will offer to ship it to Europe for a “reasonable fee”, unless Hernán Cortés has joined the Continental Congress, in which case it will be shipped free of charge. However if you have a Galleon, you are expected to use it to take the Treasure Train to Europe yourself.
The Caravel, the Merchantman and the Galleon are unarmed naval units, with two, four or six cargo holds, respectively. A cargo hold may contain up to 100 units of goods, or any land unit except the Treasure Train, which takes up six cargo holds all by itself, and the Wagon Train, which can not be transported by sea at all.
The Privateer and the Frigate are armed naval vessel with two or four cargo holds, respectively. The Privateer is unique in that it does not fly the flag of your country and can attack the vessels of other countries with impunity. It becomes even more deadly when Francis Drake joins the Continental Congress.
The Man of War is the most powerful naval vessel, and has six cargo holds. At the beginning of the game, only the Monarch has these powerful ships, but when you gain independence you can also construct them in your colonies.
The Monarch has two types of units that you can never command, however. These are the King’s Regular and King’s Cavalry, which are roughly as powerful as your Colonial Regulars and Colonial Cavalry.
The natives also have two types of units that you can not recruit, namely the Indian Brave and the Indian Dragoon. These are strong fighting units that can also carry up to 100 units of goods each.
Most units can be equipped with tools, horses, muskets, or a bible. Most types of equipment are not compatible with each other, however. If you equip a unit with tools, for example, then that unit will drop any other equipment it is currently using. Equipment grants a unit certain abilities, which it does not possess otherwise. Certain units are particularly skilled with a certain type of equipment, but without it they have no special abilities:
Of course, units that do not represent people, such as ships, wagon trains and treasure trains, can not be equipped. The Indian Convert is another unit that can not be equipped.
You can equip a unit by selecting the appropriate menu item from the context menu. If the equipment is produced from a single type of goods you can also equip a unit by dragging a sufficient amount of goods from a warehouse, the European market, a ship or wagon train and dropping it onto the unit while holding down the alt key.
In FreeCol, your colonists come from all walks of life. Some are unskilled Petty Criminals, who are deported to the colonies. Others are Indentured Servants, or Free Colonists with moderate skills. Still others are masters of their craft, experts at their trade or profession, who were educated at the Royal College in Europe. If you have enough gold, you can recruit units directly from the Royal College.
Not all skills, however, can be learned in Europe. Sugar, Cotton and Tobacco, as well as Furs are apparently unknown in Europe. Thus, Master Sugar Planters, Master Cotton Planters, Master Tobacco Planters, as well as the Expert Fur Trappers, can not be recruited in Europe.
At the beginning of the game, these skills can only be learned at Indian Settlements, or through experience. If you put a Free Colonist to work outside of the colony for a long time without changing his work assignment, he may learn the necessary skill and become an expert. This does not work for the more complicated jobs within the colony, however.
The Schoolhouse and its upgrades, the College and the University, allow you to train your units yourself by placing a skilled unit in one of these buildings. If a suitable student exists in the colony it will automatically appear next to the teacher in the building, as well as continuing to perform its current task. Note that the Master Sugar Planter, the Master Cotton Planter, the Master Tobacco Planter, the Master Fur Trader, the Master Distiller, the Master Weaver, the Master Tobacconist, the Master Blacksmith and the Master Gunsmith all require at least a College, while the Elder Statesman, the Firebrand Preacher and the Jesuit Missionary even require a University to teach their profession.
Usually, units need four turns to learn a profession taught in schoolhouse, six turns to learn a profession taught in college, and eight turns to learn a profession taught at university. However, the colony’s production bonus or penalty is subtracted from this value, so that units in colonies with a production bonus learn faster, and units in colonies with a production penalty require more time to learn.
A Free Colonist can learn any skill or profession in this manner, but Petty Criminals and Indentured Servants can not. However, a Petty Criminal may become an Indentured Servant, and an Indentured Servant may become a Free Colonist through education. Any colonist placed in a schoolhouse, college or university is able to provide this kind of education.
Petty Criminals may also become Indentured Servants, and Indentured Servants may also become Free Colonists by winning a battle and being promoted. Free Colonists can be promoted to Veteran Soldiers, and after the Declaration of Independence, these may be promoted to Colonial Regulars.
Indian units are more productive than free colonists when working outside of the colony, and less productive when working inside a building. Indian units can not become free colonists through education, but all Indian units become free colonists as soon as Bartolomé de las Casas joins the Continental Congress.
However, Indian Converts that join your colonies after Bartolomé de las Casas has been elected to the Continental Congress will always remain converts and can not be upgraded.
Scouts can explore the New World and enter Indian Settlements in order to speak with the tribal chiefs. A scout entering an Indian Settlement may become a Seasoned Scout through experience. A colonist investigating a Lost City Rumours may also be upgraded to a Seasoned Scout, unless that unit already has another skill.
A tile can only be occupied by units of a single Player. If a unit of another Player attempts to enter that tile, combat ensues. The combat mechanism of FreeCol is very simple: Each unit has an attack strength and a defence strength. Attack bonuses and defence bonuses granted by terrain, fortifications or Founding Fathers are added to the base values of the units. A random element is then added to the calculations in order to determine the winner of the battle. If a tile is occupied by more than one unit, the attacker will fight against the defender with the strongest defence.
Most units that win a battle may be promoted, and all units that lose a battle will always be captured, demoted, damaged or destroyed. A Petty Criminal may be promoted to an Indentured Servant, and an Indentured Servant may be promoted to a Free Colonist. A Free Colonist may be promoted to a Veteran Soldier, which in turn may be promoted to a Colonial Regular, but only after the Declaration of Independence.
A Dragoon that loses a battle will be demoted to a Soldier, and a Soldier that loses a battle will be demoted to an unarmed colonist. An unarmed colonist that loses a battle is either captured, if the attacker is a European Player, or slaughtered, if the attacker is a Native Player. If an unarmed unit is defending a colony, the colony is captured if the unit loses a battle. Wagon Trains and Treasure Trains may also be captured by a European Player and destroyed by a Native Player. Native units that lose a battle are always slaughtered.
Naval units and Artillery can not be promoted. A beaten artillery unit becomes a Damaged Artillery, which can not be repaired and will be destroyed if it loses another battle. Ships are either sunk or damaged when they lose a battle. In either case all units and cargo aboard the ship are lost, and the ship automatically returns to the nearest repair location. This may be one of your colonies with a Drydock or the Home Port.
The Frigate, the Man of War and the Privateer have the ability to capture the goods aboard an enemy ship they have bested in battle. Naturally, they can not take more cargo than their holds will allow.
Naval units can also attack colonies on coastal tiles, although their chance of success is not very high. And colonies with a Fort or Fortress will automatically fire at enemy ships on adjacent ocean tiles.
7.3.1 Combat Bonuses and Penalties
Bonuses and penalties for naval units:
Bonuses and penalties for land units:
Chapter 8
The Continental Congress
As the player generates Liberty Bells, Founding Fathers are elected to the Continental Congress. The Founding Fathers are historical figures who played a more or less important part in the conquest of the New World. Each Founding Father grants the player a new bonus or ability, or causes a certain event to occur, much like the “Wonders of the World” in the Civilization series. At the beginning of the game, you will need only a few Liberty Bells to elect a Founding Father to the Continental Congress, but as the game progresses this number may increase to many hundred Bells.
Adam Smith (1723–1790), better known as the Father of Modern
Economics, penned several texts pertaining to Economic theory, including, “The
Wealth of Nations” his most famous text. As soon as Adam Smith joins the
Continental Congress, the player is allowed to build factories, which produce 1.5
units of manufactured goods for each unit of raw material consumed.
Jacob Fugger II (1459–1525) was an extremely wealthy German
merchant and banker who amassed a fortune with family partnerships and
stock holdings in the mining industries. As soon as Jacob Fugger joins
the Continental Congress, all Boycotts currently in effect are dropped.
Peter Minuit (1580–1638) bought what later became known as Manhattan
Island from Native Americans for about 60 Dutch guilders. He later colonized
the Delware Bay area as well. As soon as Peter Minuit is elected to the
Continental Congress, the Indians no longer demand payment for their land.
Peter Stuyvesant (1592–1672) was appointed Governor General of the New
Netherlands, which, after a British invasion he could not stop, became New York.
With the election of Peter Stuyvesant, the construction of custom houses becomes
possible.
Jan de Witt (1625–1672) was a great Dutch statesmen. He represented the
merchants and a encouraged industry and commerce. He also negotiated several
important treaties for the Dutch to end wars with England. As soon as Jan
de Witt is a member of the Continental Congress, trade with foreign
colonies becomes possible. According to our default rules (but not the classic
rules), de Witt also enables custom houses to export boycotted good,
provided that you are at peace with at least one other European nation.
Ferdinand Magellan (1480–1521) was one of the greatest explorers to
navigate the globe. Magellan was first to circumnavigate the globe and cross the
Pacific Ocean. Magellan’s election to the Continental Congress increases the
movement of all naval vessels by one, and the time to sail between Europe and the
New World is reduced.
Francisco Vázquez de Coronado (1510–1554) was the first European
explorer to see the Grand Canyon. Though he never found the golden cities he
searched for, his mapping of the area now called the Southwestern US was
important to further exploration. As soon as Francisco de Coronado joins the
Continental Congress, all existing colonies become visible on the map.
Hernando de Soto (1496–1542) was the first European to explore Florida
and the southeastern US. He also held a prominent role in conquests of Central
America. If Hernando de Soto is a member of the Continental Congress, the
exploration of Lost City Rumours always yields a positive result, and all land
units have an extended sight radius.
Henry Hudson (1565–1611) was an English navigator who explored
and mapped a large area of the northeastern North American continent.
Many waterways in that region are named in his honour. His original
goal was to find the famed Northwest Passage. The election of Henry
Hudson to the Continental Congress doubles the output of all Fur Trappers.
Robert La Salle (1643–1687) was the first European to travel the length of
the Mississippi river, while on a mission to set up numerous trading posts along
its banks. He later claimed the whole basin as Louisiana in honor of the French
King. Later, he explored several of the Great Lakes. If Robert La Salle is a
member of the Continental Congress, all colonies gain a stockade as soon as their
population reaches three colonists.
Hernán Cortés (1485–1547) was a famed Spanish conquistador who
overthrew the Aztec Empire and claimed Mexico for Spain. As soon as Hernán
Cortés joins the Continental Congress, conquered native settlements always yield
treasure (and in greater abundance) and the King’s galleons transport it free of
charge.
George Washington (1732–1799) was the general who lead the colonial
army to victory over the British to gain independence for the colonies. This
victory and his leadership led to his being named the new nation’s first President.
If George Washington is a member of the Continental Congress, any soldier or
dragoon who wins a combat is automatically upgraded to the next possible level.
Paul Revere (1734–1818) was the famed rider of colonial America who
mounted his horse and rode through the countryside alerting colonists
that British soldiers were coming. He was captured during the ride and
later released when his captors believed they were in grave danger and
their prisoner might slow them down. With Paul Revere a member of the
Continental Congress, a colonist automatically takes up any stockpiled
muskets and defends an otherwise undefended colony if it is attacked.
Francis Drake (1542–1596) was a great English sea captain, the first
Englishman to circumnavigate the globe and a hero in the fights against the
Spanish Armada. The presence of Francis Drake in the Continental Congress
increases the combat strength of all Privateers by 50%.
John Paul Jones (1741–1792) was hailed as a great sea captain in America,
and uttered the famous words "Sir, I have not yet begun to fight" while fighting
the British at sea. He later watched his ship sink to the bottom of the ocean from
the deck of a British vessel. As soon as John Paul Jones is elected to the
Continental Congress, a Frigate is added to your colonial navy for free.
Thomas Jefferson (1743–1826), a powerful voice of patriotism, was
credited with writing the Declaration of Independence. He later became
the 3rd President of the US. The election of Thomas Jefferson to the
Continental Congress increases Liberty Bell production in colonies by 50%.
Pocahontas (1595–1617) was a peacemaker between early Jamestown settlers
and the Native Americans. She is credited with sending food and other supplies to
starving colonists there during harsh times. She later converted to Christianity
and married an Englishman. When Pocahontas joins the Continental Congress, all
tension levels between you and natives are removed and Indian alarm is generated
half as fast.
Thomas Paine (1737–1809) inspired colonists with his pen at the urging of
Benjamin Franklin. He published a pamphlet, "Common Sense", guiding the
thoughts of patriots all over the colonies. The election of Thomas Paine to the
Continental Congress increases Liberty Bell production in all your colonies by the
value of the current tax rate.
Simón Bolívar (1783–1830) is remembered as a great leader in the struggle
for South American independence from Spain. Bolívar freed what is now
Venezuela and later became its first President. When Simón Bolívar joins the
Continental Congress, the Sons of Liberty membership in all existing colonies is
increased by 20%.
Benjamin Franklin (1706–1790), a heavy contributor to the Declaration of
Independence, was one of the voices of the Revolution. He traveled extensively
between Europe and the colonies, and gained the support of the French in the
war. As soon as Benjamin Franklin is elected to the Continental Congress, the
King’s foreign wars no longer have effect on relationships in the New
World, and Europeans in the New World always offer peace in negotiations.
William Brewster (1567–1644) was the Puritan leader of the Plymouth
colony in New England. As soon as William Brewster joins the Continental
Congress, criminals or indentured servants no longer appear on the docks and you
can select which immigrant in the recruitment pool to move to the docks.
William Penn (1644–1718), a close friend of the Duke of York, was granted
the land that is mostly Pennsylvania, Delaware, and New Jersey. He governed the
Quaker colony for several years to provide a haven to fellow Quakers. The
election of William Penn increases cross production in all colonies by 50%.
Father Jean de Brébeuf (1593–1649) befriended the Huron Indians and
converted many to Christianity. He died at the hands of the Iroquois who
had finally defeated their enemy, the Hurons. With Jean de Brebeuf a
member of the Continental Congress, all missionaries function as experts.
Juan Ginés de Sepúlveda (1781–1872) was a Spanish theologian who spoke
out for the conquest of Indian lands and forced evangelization of the natives. The
election of Juan de Sepulveda to the Continental Congress increases the
chance that a subjugated Indian settlement will “convert” and join a colony.
Bartolomé de las Casas (1474–1566) was a Catholic Priest who traveled the
Indies converting Indians and chastising Spain for their treatment of the Natives.
When Bartolomé de las Casas joins the Continental Congress, all existing Indian
converts become free colonists.
Chapter 9
The Birth of a Nation
At the beginning of the game, all your colonists will be Tory Loyalists, who support your Monarch and are opposed to your policies. For this reason, colonies with more than a certain number of tories (which depends on the difficulty setting and defaults to four colonists) suffer a production penalty of one unit. If the limit is exceeded by four colonists, the penalty increases to two units and may well threaten the survival of the colony.
Liberty Bells, however, will turn these Tories into Sons of Liberty, who support your policies. Colonies in which more than 50% of the population are Sons of Liberty enjoy a production bonus of one unit, which is increased to two units as soon as 100% of the population become Sons of Liberty.
The colonies of European powers often changed hands as spoils of war. In the
Treaty of Utrecht , which concluded The War of Spanish Succession ,
for example, the French ceded most of their North American possessions to the
English.
In the game, your Monarch may declare war on a foreign power, and if Benjamin Franklin has not yet joined the Continental Congress, that war will also spread to the New World. Furthermore, if the Treaty of Utrecht occurs in the game, the weakest computer player will cede all its colonies and units to the strongest computer player and withdraw from the New World.
In the game, the War of Spanish Succession is triggered as soon as 50% of a player’s population support the declaration of independence. If there are less than two computer players still active in the New World at this time, then the Treaty of Utrecht event can not occur.
9.3 The Declaration of Independence
As soon as 50% of your entire population support the Sons of Liberty, you can declare the independence of your colonies. Your Monarch will not be amused and will send the Royal Expeditionary Force to quell the insurrection. In order to gain independence, you must defeat the Royal Expeditionary Force by capturing or destroying nearly all of their land forces and by taking back any colonies they might have captured. You do not need to destroy the fleet. However, you do need to maintain at least one independent colony that is on the coast and accessible from Europe—if the Royal Expeditionary Force captures all your coastal colonies you have lost.
At the declaration, colonies with strong support for the Sons of Liberty sometimes promote veteran soldiers at work there to Colonial Regular in preparation for the coming war. The European enemies of your Monarch may support your effort by dispatching an Intervention Force, provided that you generate a sufficient number of Liberty Bells after the War of Independence has begun.
If you continue to play after successfully defeating the Royal Expeditionary Force, your new free nation will no longer be subject to the whims of a monarch. Your Custom House will continue to operate, trading now with all comers instead of just your former nation, and therefore the external tax rate will be fixed at zero, with no threat of boycotts. However, you will no longer be able to sail to your former home port. Future versions may implement sailing to all European ports.
FreeCol is still alpha software. In plain English, this means that it is full of bugs. Some of these bugs have already been reported, but have not been fixed yet. You can find a list of these bugs, and report new bugs by using our SourceForge bug tracker.
Even in single player mode, FreeCol is a client-server game. The communication between client and server can fall out of step. If this happens, the server often tries to recover by requesting a reconnect. If this occurs, please accept in order to continue playing. In some cases, the game may come to a halt during the turn of a computer opponent. If this happens to you, you can generally reconnect to the server by using the reconnect option in the game menu or by pressing ctrl-r.
A reconnect is often an indication of a bug. If you report a reconnect problem, more detail is available in the java log file (usually called FreeCol.log) which is very helpful to the developers if attached to the bug report. The log file can sometimes be large enough to exceed the attachment limit at SourceForge, in which case feel free to omit the bulk of the file—the critical information is likely to be near the end (in the form of a java exception message), but you should always retain the first few lines which contain the FreeCol version and system information.
Possibly the most frequently reported type of bug amounts to “A computer player did something stupid”. This is only too well understood. The FreeCol AI players are weak, and blatantly cheat to compensate (which can be partly controlled by the ‘AI-Cheating’ difficulty options). We hope one day that the FreeCol AI players will be interesting and challenging opponents without having to cheat, but much work needs to be done to get there.
Copyright ©2002–2022 The FreeCol Team.
This manual is free software; you may redistribute it and/or modify it under the terms of the GNU General Public License as published by the Free Software Foundation; either version 2, or (at your option) any later version.
This is distributed in the hope that it will be useful, but without any warranty; without even the implied warranty of merchantability or fitness for a particular purpose. See the GNU General Public License for more details.
A copy of the GNU General Public License is available on the World Wide Web at the GNU General Public Licence. You can also obtain it by writing to the Free Software Foundation, Inc., 59 Temple Place - Suite 330, Boston, MA 02111–1307, USA.
Furthermore, permission is granted to copy, distribute and/or modify this file under the terms of the GNU Free Documentation License, Version 1.2 or any later version published by the Free Software Foundation; with no Invariant Sections, no Front-Cover Texts, and no Back-Cover Texts.
Furthermore, permission is granted to copy, distribute and/or modify this file under the terms of the Creative Commons Attributive Share-Alike license (CC-BY-SA).